How to Tell If BIOS Update Worked: A Practical Guide
Learn how to verify a BIOS update succeeded with clear checks, version verification, and safe troubleshooting. This guide from Update Bay breaks down POST signals, version reads, and practical tests to confirm success without risking your hardware.

A BIOS update worked when the system boots normally, the BIOS/firmware version reflects the new release, and there are no POST errors. Verify the version in BIOS setup, check boot order, and observe hardware behavior for expected changes. If the new version is shown on startup or in BIOS, the update succeeded.
What BIOS update does and why verification matters
BIOS updates (firmware updates) improve hardware compatibility, fix bugs, patch security issues, and sometimes unlock new features. A failed or incomplete flash can leave the system unstable or unbootable, which is why verification is the final checkpoint. The Update Bay team notes that the most reliable verification combines a version check with meaningful functional observations: confirm the new firmware is active, verify Power-On Self Test (POST) results, and look for hardware behavior changes that the update intends to enable. Start by identifying your exact motherboard or system model, the target BIOS version, and the release notes. Then plan a rollback path just in case something goes wrong. This approach minimizes downtime and reduces risk while giving you confidence the flash succeeded. The process may feel technical, but patient, careful checks pay off with a stable system and accurate firmware state.
How BIOS updates are delivered and what to avoid
BIOS updates are delivered as a flash image written to the motherboard firmware. They can be installed via a USB-based flasher, an in-UEFI flashing utility, or an OS-assisted updater from the motherboard maker. Important caution: power loss during flashing can corrupt the firmware and render the board unbootable. Always use a reliable power source, avoid updates during storms, and do not interrupt the flash once it begins. Ensure you download the correct file for your exact model and revision. Read the release notes for known issues and required settings, and back up critical BIOS configuration before starting. A careful approach here prevents many post-update headaches.
Requirements and prerequisites before verifying
Before diving into verification, gather essential details: your motherboard/system model, current BIOS vendor and version, the target version you flashed, and a rollback plan. Create recovery options such as a USB bootable fallback or a CMOS reset method in case the flash doesn’t finish correctly. Have admin access and a stable OS if you plan OS-assisted checks. Document all IDs and settings, so you can compare values after the update. Preparing ensures you can validate the flash without risking data loss or hardware damage. It also reduces uncertainty when you start the verification steps.
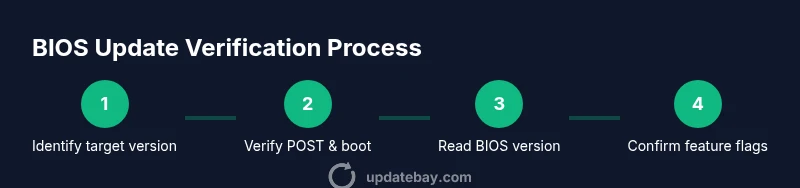
Step-by-step quick verification: post-boot checks
- Power on the system and observe the POST messages for any errors or warnings.
- Enter the BIOS/UEFI setup during boot (Del, F2, or the key shown on screen).
- Navigate to the BIOS version or firmware information page to confirm the new version number.
- Check critical settings (boot order, memory profile, enablement flags) to ensure they remain correct after the update.
- Save and reboot, then observe the startup sequence for stability.
- If the system boots into the OS without issues, proceed to a light workload test.
Tip: If you see any unexpected POST codes, pause and consult the motherboard manual for code definitions. A minor discrepancy may indicate the flash did not complete.
Verifying BIOS version using the UEFI/BIOS interface
Within the BIOS/UEFI interface, look for a clearly labeled line such as "BIOS Version/Date" or "Firmware Version." Compare the shown version against the target version listed in the release notes. Some vendors display a date next to the version; ensure both the version and date align with the update you applied. If the new version is present, you’ve likely completed a successful flash. Some systems also reveal feature flags or virtualization options that the update enables; verify these are visible and adjustable if relevant to your setup. If there’s a mismatch, do not proceed with extra changes; instead, reattempt the flash with the correct file and power conditions.
Verifying BIOS version via Windows tools
If you primarily work from Windows, several built-in utilities reveal BIOS information. Open Run (Win + R), type msinfo32, and press Enter. In the System Summary, locate BIOS Version/Date to confirm the new firmware is installed. You can also use PowerShell: Get-WmiObject win32_BIOS | Select-Object SMBIOSBIOSVersion, ReleaseDate to read the version and date. Compare these values to the release notes for the target BIOS. If they match, you’re seeing the updated firmware. Running a quick hardware check afterward can validate that firmware changes did not impact basic device functionality.
Verifying BIOS version via Linux/macOS tools
On Linux and macOS, you can read BIOS data with dmidecode (Linux) or system_profiler (macOS) where available. Run sudo dmidecode -s bios-version to display the current BIOS version. For date, use sudo dmidecode -s bios-release-date. Cross-check the output with the target version and date. If you don’t have dmidecode, you can check firmware-related indicators in system information utilities provided by your distribution or Apple’s System Information app. If the version matches the target, you’ve confirmed the flash completed successfully.
Checking hardware behavior after update
Beyond version reads, observe practical hardware behavior:
- USB controller, NVMe drives, and SATA ports should behave as before unless the update specifies changes.
- Memory profiles (e.g., XMP) should load as configured if the update affects memory stability.
- Peripheral startup times and POST duration may shift slightly after firmware changes.
- If your system supports new features (e.g., boot security, virtualization enhancements), verify those are active in the relevant menus.
Document any noticeable changes, and test a few repeats of cold boots to confirm consistency.
What to do if the BIOS update did not take
If verification shows the target version isn’t active, reattempt the flash using the same file and verify you’re using the correct revision. Ensure the power source is stable and the process isn’t interrupted. If the board still reports the old version, try a CMOS reset (clear CMOS) following the manual’s procedure, then reflash. In some cases, the recovery mode or dual-flash design requires a slightly different procedure. If you’re unable to recover, contact the motherboard manufacturer’s support with your model, current version, and the files you attempted.
Safety and common mistakes to avoid
- Never flash firmware on laptops running solely on battery power; always plug in.
- Do not use vendor files from untrusted sources; always download from the official site.
- Do not interrupt power during flash, even for a moment.
- Avoid using outdated or incorrect BIOS files that don’t match your model revision.
- Back up essential data and document BIOS settings before flashing to simplify recovery if needed.
Authority sources
- https://www.nist.gov/topics/firmware
- https://www.cisa.gov
- https://www.tomshardware.com/
For deeper reading on firmware integrity and safe flashing practices, consult these reputable sources for broader context beyond individual motherboard manuals.
Next steps after a successful update
With verification complete, create a quick baseline of your system’s performance: record BIOS version, key settings, and a short stability test. If you rely on specific motherboard features, test them under real workloads to confirm expected behavior. Consider enabling automatic BIOS updates if your platform supports it, but pair this with periodic manual checks to verify compatibility after major OS or driver updates. Finally, store a confirmatory note in your system documentation and keep your rollback plan handy in case you encounter future issues.
Tools & Materials
- Computer with power supply(Ensure mains power or plugged-in AC adapter during update/verification)
- Backup/rollback plan(Have a CMOS clear or recovery option documented)
- USB drive (at least 8 GB)(For recovery tools or flash utilities if needed)
- Access to BIOS/UEFI setup(Key to enter during boot (e.g., Del, F2, F10))
- Stable internet connection(To download correct BIOS file and read release notes)
- Motherboard model documentation(Needed to confirm correct version and revision)
- OS admin rights(Required for OS-based verification commands under Windows/Linux/macOS)
Steps
Estimated time: 45-90 minutes
- 1
Power down and prep
Shut down the system and connect a reliable power source. This prevents power loss during flashing or verification. If on battery, plug in and ensure charge is sufficient. Verify that you have the correct BIOS file for your exact model before proceeding.
Tip: Have a recovery option ready in case the flash needs rollback. - 2
Enter BIOS/UEFI and locate version
During boot, press the BIOS entry key shown on screen. Find the firmware version label and note the current value before comparing with the target version after the update.
Tip: If you don’t see a version, try the main System Information panel or advanced menu. - 3
Compare with release notes
Open the release notes for your BIOS update and confirm the target version matches the file you flashed. Look for notes about new features or bug fixes that confirm the update’s intent.
Tip: Keep the notes handy in case you need to troubleshoot. - 4
Boot into OS and perform a light test
Let the system boot into the operating system and run basic tasks to confirm stability. If there are crashes or freezes, halt further changes and revisit the flash procedure.
Tip: Avoid heavy workloads until you confirm stable boot. - 5
Run cross-checks with Windows/macOS/Linux
Use OS-based commands to verify BIOS version and, if applicable, changes in hardware behavior. This cross-check confirms consistency across environments.
Tip: Record output from each OS command for future reference. - 6
Perform a CMOS reset if needed
If the update isn’t recognized, consider a CMOS reset following the motherboard’s procedure, then re-run the update and verification.
Tip: Only perform CMOS reset when you’re prepared to reconfigure settings.
Frequently Asked Questions
What is the first sign that a BIOS update worked?
The first sign is that the BIOS version shown in the firmware matches the updated version and the system boots without POST errors. If the version isn’t updated, recheck the file and reflash with proper power and a verified file.
The first sign is the updated BIOS version shown during boot and a clean POST with no errors.
Can I verify a BIOS update from Windows?
Yes. Use msinfo32 to view BIOS Version/Date and compare with the target release notes. You can also run a command like wmic bios get smbiosbiosversion to confirm the version. If it matches, the update is present.
Yes—check BIOS version in Windows via system information or PowerShell commands to confirm the update.
What should I do if the BIOS version doesn’t change?
If the version remains unchanged, re-check the file, model, and revision. Re-flash with correct media and ensure power remains stable. If issues persist, consult the motherboard maker’s recovery procedures.
If the version didn’t update, verify you used the correct file and retry the flash with power stability; consult recovery steps if needed.
Is a CMOS reset always required after a BIOS update?
Not always. A CMOS reset is only needed if the system fails to boot or shows inconsistent settings after the update. Follow the motherboard manual exactly for resetting procedures.
A CMOS reset isn’t always required, but use it if settings are unstable after updating.
What features should I test after a BIOS update?
Test boot times, USB and NVMe detection, memory profiles (like XMP), and any new security or virtualization options enabled by the update. Validate these in both BIOS and the OS.
Test boot, hardware detection, memory profiles, and any new features enabled by the update.
Where can I find reliable bios-update verification information?
Refer to official release notes from the motherboard maker, vendor documentation, and trusted tech publications. For broader firmware guidance, see authoritative sources such as government or major publications.
Check official release notes and trusted sources for verification guidance.
Watch Video
What to Remember
- Confirm BIOS version matches the target release.
- Verify POST and boot stability before trusting the flash.
- Use OS-level tools to corroborate BIOS data across environments.
- Maintain a rollback plan and recoverability options.
- Record settings and outcomes for future updates.