Minecraft Update How To: Master the Latest Patch
Learn how to update Minecraft across Java and Bedrock, back up worlds, manage mods, and verify your version with step-by-step guidance from Update Bay.

By the end of this guide you will be able to update Minecraft on both Java and Bedrock editions, verify you’re on the latest patch, and protect your worlds before updating. You’ll learn how to check your current version, update the launcher or store app, resolve common errors, and verify mod or add-on compatibility after upgrading.
Understanding Minecraft Update Basics
Minecraft updates come in two main streams: Java Edition patches and Bedrock Edition patches. Although both share the goal of adding features, fixing bugs, and improving performance, their delivery methods and content can differ. The Update Bay team emphasizes that knowing which edition you play is essential before you start updating, because cross-edition world compatibility is limited. In practice, updates are delivered through your launcher or marketplace app, and sometimes through platform-specific stores. Always read the patch notes before updating to understand new features, potential compatibility issues, and any required world backups. This approach helps you minimize surprises and keep your worlds safe as you move from one version to the next. It’s wise to set expectations: updates can change game behavior, alter crafting recipes, and modify item IDs or spawn rules. By understanding the basics, you’ll reduce friction and maintain stability across versions. As you prepare for an update, remember that some patches enable new gameplay mechanics that can affect sky-high farms, redstone builds, and mob behavior. A little planning goes a long way when patching Minecraft. According to Update Bay, knowing which edition you play is essential before you start updating, because it determines where to fetch the update and how compatibility is handled. This background sets the stage for a smoother updating journey and helps you avoid common missteps that derail progress.
Check Your Current Version and What’s New
To update safely, start by confirming your current version. In Java Edition, open the Minecraft Launcher and look for the version label beneath your profile. In Bedrock Edition, check the main menu screen or the store page in your platform's app. Then read the official patch notes from Mojang/Microsoft or the Minecraft Help Center to understand what's included in this update, like bug fixes, performance improvements, or new blocks. If you’re using mods or resource packs, inspect compatibility notes for the patch: some mods may require updated Loader versions or specific Minecraft builds. Update Bay recommends documenting your current world seeds and backup status before applying any patch, so you can revert if something goes wrong. This step reduces the risk of missing features or breaking worlds and gives you a clear baseline to compare against after updating. For minecraft update how to seekers, this step ensures you know exactly what you’re updating and why. Keeping notes also helps you track changes across multiple machines in a shared world environment.
Updating Minecraft Java Edition
This section covers Java Edition specifically, including launcher updates, asset downloads, and post-update checks. First, ensure your device meets the minimum system requirements and that you have a stable internet connection. Then open the official Minecraft Launcher; if an update is available, you’ll see a prompt to update the launcher or to install the latest game version. Accept the update and allow the launcher to download required assets and libraries. Once the download finishes, press Play to launch the game and let assets initialize—this can take several minutes the first time after an update. After you load in, verify the version shown on the title screen or in the pause menu, and then skim the new features and changes in the patch notes. If you’re using mods, pause and check compatibility before launching. Update Bay notes that Java patches can sometimes alter redstone timing, villager behavior, or world generation. Consider testing in a fresh world or a copy of your existing world to confirm stability. Finally, back up again after confirming the update is functioning as expected. For minecraft update how to enthusiasts, this section provides precise hands-on steps to minimize risk and maximize the new features’ value.
Updating Minecraft Bedrock Edition
Bedrock updates are distributed through the Microsoft Store, Apple App Store, Google Play, or your console's store, depending on your platform. Start by ensuring the Bedrock edition on your device is linked to the same Microsoft/Xbox account that owns your copy. In Windows 10/11, open the Microsoft Store, go to Library, and click Get updates; on consoles, visit the updates tab. If an update is shown, select Install and wait for the download to finish. Launch the game and confirm the version in the main menu, then review patch notes for Bedrock-specific changes such as cross-play fixes, marketplace content adjustments, or performance improvements. Because Bedrock updates can differ from Java, you may notice different UI changes or feature availability across platforms. If you rely on addons, add-ons, or Marketplace content, ensure they’re compatible with the new version before re-enabling. Update Bay emphasizes backing up important worlds before any big Bedrock patch and testing in a copy if possible. After updating, run a quick local test by loading a few simple worlds and verifying that basic mechanics like mining, crafting, and world saving work as expected.
Managing Mods and Resource Packs After Update
Modding and custom resource packs can significantly influence how updates behave. Before you update, list all mods and mod loaders you use, including version numbers and the loader version (such as Fabric or Forge). Check each mod’s compatibility notes with the target Minecraft version. If updates are unavailable or uncertain, it’s safer to temporarily disable mods and launch a clean world to validate the base game first. After updating the game, update or reinstall your mods if compatible, and test key systems in a test world to catch conflicts early. For resource packs, ensure they are compatible with the new version by visiting the authors’ pages or the official resources hub. The patch notes might also indicate changes to item IDs, crafting recipes, or block properties that affect modded content. Update Bay notes that some worlds with heavy redstone contraptions or complex command blocks can be sensitive to version changes, so incremental testing is recommended. Finally, keep backups of your entire modded setup so you can revert if needed.
Common Update Problems and How to Fix Them
Even with preparation, you may encounter issues after updating. Launcher won’t start? Try restarting the device, clearing launcher cache, or reinstalling the launcher. Download errors or corrupted assets? Check your internet connection or switch to a different network, then rerun the update. If worlds fail to load or crash to menu, restore from the backup and verify your game files. For Bedrock players, cross-play or realm issues can crop up after patches; ensure all clients are updated and check realm status. If you rely on external launchers or launch via a different account, sign out and sign back in to refresh credentials. When you encounter performance problems, adjust in-game settings, reduce render distance, and update graphics drivers if you’re on Java Edition. Update Bay recommends keeping a separate test world to isolate issues from your main gameplay, which makes debugging faster and safer. For minecraft update how to scenarios, this section provides troubleshooting pathways you can follow calmly.
Best Practices Before and After Updating
Before updating, create multiple backups, ideally in two locations: local storage and cloud storage. Keep a record of installed mods, resource packs, and their versions. Make sure your device is plugged in or has ample battery for laptops; updates can sometimes take longer than expected. After updating, verify that your world loads correctly, that you can save, and that you can reopen the world. If you run into issues, consult the patch notes and the community forums for known issues and fixes. Maintain a routine: check for updates every few weeks or after major patches; staying current reduces the risk of security vulnerabilities and incompatibilities. Finally, consider channeling the update flow into a test environment before rolling to all players or worlds. By adopting a cautious but proactive approach, you’ll enjoy new features while preserving your progress.
Tools & Materials
- Stable internet connection(Wired Ethernet is preferred when possible to avoid drops during large downloads)
- Minecraft launcher(Use the official launcher for Java Edition updates; ensure it’s up to date)
- Account credentials(Have your Minecraft/Microsoft account ready to sign in)
- Backup storage(External drive or cloud storage with at least the size of your local saves)
- List of mods/resource packs(Record versions and loaders to check compatibility)
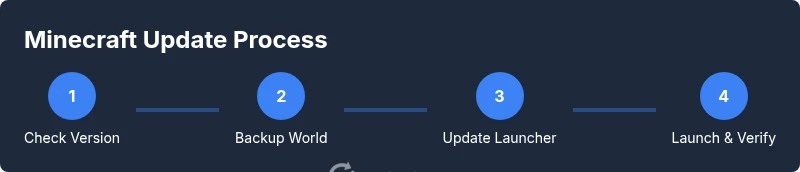
Steps
Estimated time: 30-90 minutes
- 1
Check your current version
Open the launcher or storefront app and locate the version label. Compare with official patch notes to understand what's changing. Before proceeding, make a quick note of your current world state and any mods installed.
Tip: Note the exact version string and the date of your last backup. - 2
Back up your worlds and settings
Copy your worlds and important config files to a separate location. If possible, use a dedicated backup tool or cloud storage so you can restore quickly if something goes wrong.
Tip: Backups should be offline if feasible to protect against local drive failures. - 3
Update the launcher/store app
Check the official launcher or store app for updates and install them. A successful update ensures the patch downloads cleanly and reduces post-update errors.
Tip: Run the update on a stable network and avoid multitasking during downloads. - 4
Launch the game to initialize assets
Start Minecraft and allow assets and libraries to update. This first run after an update can take longer as new data is prepared.
Tip: If assets fail to download, restart the launcher and retry the update. - 5
Verify the version and read patch notes
Confirm you are on the latest version and skim patch notes for changes that affect gameplay, blocks, or performance.
Tip: Note any features you want to test in a copy of your world. - 6
Test key gameplay and features
Load a small test world to verify core mechanics (mining, crafting, farming) work as expected and that there are no immediate crashes.
Tip: Observe any UI changes or new controls introduced by the patch. - 7
Update mods and resources if applicable
Check each mod and loader for compatibility. Update or disable mods that are not yet compatible with the new version.
Tip: Test modded features in a dedicated test world before applying to main worlds. - 8
Troubleshoot if issues arise
If you encounter errors, revert to an earlier backup and consult official notes or forums for known fixes.
Tip: Keep a calm, methodical approach to avoid data loss.
Frequently Asked Questions
Do I need to back up my worlds before updating Minecraft?
Yes. Backing up protects your worlds if the update introduces bugs or corrupts data. Keep multiple copies in different locations when possible.
Yes, it's important to back up before updating to protect your worlds.
How can I tell which edition I am playing?
In Java Edition, check the launcher version badge. In Bedrock Edition, check the main menu or platform store, as the interface varies by device.
Check the launcher or store to confirm if you’re on Java or Bedrock.
What if mods aren’t compatible with the new update?
Disable mods temporarily and verify mod loader compatibility with the new version. Only update mods when confirmed compatible.
Mods can cause issues after updates, so disable and verify compatibility first.
Can I revert to a previous version after updating?
Reverting usually requires restoring from a backup made before the update. You may need to test in a copy of your world to avoid data loss.
You may revert by restoring a pre-update backup, if available.
Will this update affect my worlds or saved games?
Updates generally don’t delete worlds, but they can change block IDs, recipes, or world-generation rules. Backups keep you safe.
Worlds aren’t usually deleted, but changes can affect your progress; back up first.
Where can I find official update notes and patch details?
Official patch notes are published by Mojang/Microsoft on their help centers and the Minecraft website. They detail bug fixes, improvements, and known issues.
Check the official Mojang and Microsoft patch notes for details.
Watch Video
What to Remember
- Back up worlds before updating
- Know your edition to avoid compatibility issues
- Verify version and read patch notes after update
- Test in a copy of your world before applying to main saves
- Plan mod/pack updates around the patch notes