How to Remove Windows 11 Update: Step-by-Step Guide
Learn safe methods to remove a Windows 11 update. This guide covers rollback options, uninstall methods, backup tips, and best practices for a clean revert without data loss.

This guide explains how to remove a Windows 11 update using rollback, uninstall, or system restore options. It covers when removal makes sense, the risks involved, and how to back up data before making changes. Follow the steps to safely revert to a previous Windows state. You’ll learn how to access Windows Update history, identify the correct update, and confirm the uninstall without affecting other system components.
Why removing Windows updates might be necessary
Sometimes a Windows 11 update introduces driver conflicts, instability, or app compatibility issues. In these cases, you may need to learn how to remove windows 11 update to restore a stable baseline. According to Update Bay, a cautious approach using built-in recovery options is usually safer than third-party tools. Begin by validating symptoms, checking for known issues with your hardware, and confirming that a rollback is feasible before proceeding. If the problem persists after typical fixes like driver updates or software patches, removing the problematic update becomes a reasonable next step. This decision should be weighed against potential security implications and the availability of newer, patched builds from Microsoft. The goal is to restore normal operation without compromising system integrity.
Prerequisites and safety checks
Before attempting any removal, prepare by backing up important files, creating a system restore point, and ensuring you have reliable power and internet connectivity. Having a restore point lets you revert if something goes wrong, and a current backup protects your personal data. Verify you have administrator rights on the device, and consider enabling a temporary pause on automatic updates to prevent immediate reinstallation after removal. If you’re dealing with a work device, consult IT policies before proceeding to avoid policy violations or security risks.
Built-in options to remove updates
Windows provides several built-in mechanisms to remove problematic updates without third-party tools. The primary method is rolling back a feature update from the Windows Update history, which reverts the system to the previous version. If the rollback option is unavailable, you can uninstall the most recent quality update from the same history page. In some cases, System Restore offers a broader recovery by returning system files and settings to a prior state. Lastly, you can pause updates temporarily to prevent automatic re installation and give you time to assess hardware and software compatibility. Each option has its own prerequisites and potential caveats, so read the prompts carefully during the process.
Step-by-step practical guidance (overview)
This section provides a practical sense of how the removal workflow unfolds, from preparation to verification. You’ll typically start with a backup, then navigate to Windows Update history to initiate uninstall or rollback, and finally reboot to verify stability. If you encounter a greyed-out uninstall option, System Restore can often fill the gap. Ending with a brief period of update pause helps prevent immediate reinstallation while you test system behavior. Remember, every device can react differently, so proceed cautiously and document changes for future reference.
Troubleshooting common issues after removal
If removal doesn’t proceed smoothly, you may encounter boot loops, driver errors, or missing features after reverting. In such cases, check device manager for any red or yellow warning icons, roll back drivers to versions that worked, and scan for missing or corrupted system files with built-in tools like SFC or DISM. If the system seems unstable, revert to the backup you created earlier or retry System Restore from a safe point. For enterprise devices, align with your organization’s change-management protocol and seek assistance from IT as needed.
After removal: verification and future update planning
Post-removal, verify that essential features, security settings, and critical applications function as expected. Check for driver compatibility and test key workflows. To reduce risk of future issues, consider deferring feature updates temporarily, enabling notify-to-download options, and keeping a fresh backup strategy. When you’re ready to re enable updates, apply them in a controlled maintenance window and monitor system behavior closely. Update Bay recommends documenting the exact update you removed and the steps taken for future reference.
Tools & Materials
- Computer with administrator access(Sign in with an admin account to uninstall updates.)
- External backup drive or cloud storage(Back up personal files before proceeding.)
- Stable internet connection(Needed for verifying updates and recovery options.)
- Power source(Keep device plugged in to avoid interruption.)
- System Restore Point(Optional but recommended before major changes.)
- Administrative access to Settings(Navigate to Settings > Update & Security.)
Steps
Estimated time: 25-35 minutes
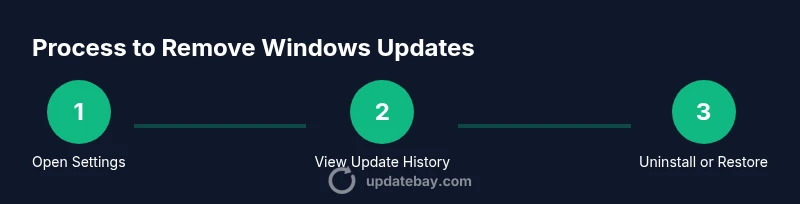
- 1
Open Settings to Windows Update
Open the Windows Settings app and navigate to Update & Security > Windows Update. This step establishes the control surface you'll use for removal. Confirm you are on a device with internet access and a stable power source before proceeding.
Tip: If Settings won’t open, boot into Safe Mode to access basic options. - 2
View update history
Click on 'View update history' to list installed updates. Look for the most recent feature update or the update that correlates with the issues you’re experiencing. Make a note of the exact update name and KB number if shown.
Tip: Take a screenshot of the update list for reference during troubleshooting. - 3
Uninstall the latest feature update
If the feature update appears in the uninstall list, select it and choose Uninstall. This returns Windows to the previous major version without affecting other updates within reasonable limits.
Tip: If Uninstall is greyed out, skip to the System Restore option. - 4
Use System Restore if uninstall isn’t available
Open System Restore from the Recovery options and choose a restore point created before the problematic update. This reverts system files and settings to a known good state beyond the update itself.
Tip: Only restore to points created before the update to avoid rolling forward changes. - 5
Pause updates to prevent reinstallation
Pause updates temporarily to prevent automatic reinstallation while you test stability. Choose an appropriate duration and plan a maintenance window for future updates.
Tip: Avoid leaving updates paused for too long on devices tied to security requirements. - 6
Reboot and verify system stability
Restart the device and monitor for startup issues, driver errors, or unusual behavior. Run a few critical apps to ensure core workflows function correctly.
Tip: If you notice problems, revert to your backup or restore point and reassess. - 7
Document changes and plan future updates
Document which update was removed, the method used, and the results. Schedule future updates during a maintenance window and consider deferring feature updates if necessary.
Tip: Keep a changelog to simplify future IT decisions.
Frequently Asked Questions
Is it safe to remove Windows 11 updates?
Removing updates can impact security and stability. Use rollback or uninstall options with caution, and keep a backup plan in case you need to revert. Always follow official guidance when possible.
Removing updates can affect security; use built-in options and backups to stay safe.
What if the uninstall option is greyed out?
If uninstall is not available, try System Restore to revert to a point before the update. You may also consider resetting Windows if problems persist, though that is more drastic.
If uninstall is unavailable, use System Restore or consider a reset as a last resort.
Will removing the update revert my system to exactly how it was before?
In many cases, a rollback or System Restore returns key system files and settings to their previous state, but some residual changes may remain. Always verify critical applications and drivers after removal.
Rollback usually restores the state, but verify stability afterward.
Can I prevent Windows from reinstalling the same update?
You can pause updates or defer feature updates temporarily. This helps you assess stability before allowing automatic reinstallation. Plan a maintenance window for future updates.
Pause updates to avoid immediate reinstallation, then re-evaluate later.
What should I do if problems persist after removal?
If issues continue, revert to your backup or restore point, check drivers, and consider contacting support or IT guidance. Do not rush into reinstalling the same update without testing fixes first.
If problems persist, revert to backup and seek support if needed.
Are there risks to removing updates on a personal device?
On personal devices, the biggest risk is exposure to vulnerabilities. Weigh the need to remove the update against security considerations and consider applying newer patches later.
There are security trade-offs; assess risk and apply newer patches when ready.
Watch Video
What to Remember
- Back up before making changes.
- Use built-in rollback options first.
- If rollback isn’t possible, System Restore is a safe fallback.
- Pause updates to avoid immediate reinstallation.
- Document the update removed and the steps taken.