How to Clean Update Cache in Windows 11
Learn how to safely clear the Windows 11 update cache to resolve stalled updates and download errors. This practical guide covers in-OS methods, manual deletion, and command-line techniques with safety tips and verification steps.

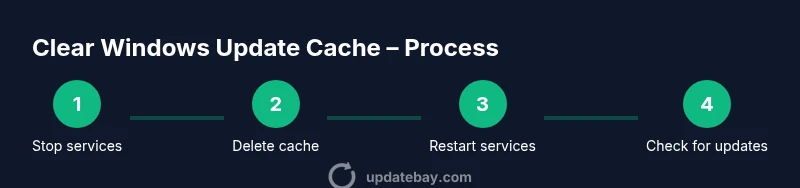
This guide shows you how to safely clean the Windows 11 update cache to resolve stalled updates and fix download errors. You'll stop the Windows Update service, locate and delete cache files, then restart the service and check for updates. The steps are designed for non-destructive maintenance. No system files are modified, and you can undo changes by rebooting.
What is the Windows update cache and why it matters
The Windows update cache is a local store used by the Windows Update service to hold downloaded update files before installation. When updates fail or stall, the cache can become corrupted or hold partial data, which can trigger repeated failed attempts. Clearing the cache forces Windows Update to fetch fresh copies of the needed files, potentially resolving errors and speeding up the update process. This is a safe, non-destructive maintenance task when done properly, and it helps ensure your device starts with a clean slate for future updates.
Understanding the cache also helps you diagnose related issues, such as unusually long download times, failed installations, or repeated prompts to reboot. While clearing the cache won’t remove your apps or personal files, it may temporarily cause longer update times as Windows re-downloads necessary files.
When to clear the update cache
Not every Windows 11 issue requires clearing the cache, but several common scenarios warrant a reset:
- Updates stall or fail with error codes (for example, 0x80070422 or 0x8024a105).
- You recently interrupted an update, and the cache may contain partial files.
- Windows Update behavior is inconsistent (downloads start and stop unexpectedly).
- You’ve installed a cumulative update that caused new bugs, and a fresh copy of the payload could help.
If you experience any of these, clearing the cache is a low-risk first step that often resolves the problem without reinstalling Windows.
Safety and backup before you begin
Before you modify system files, back up important data and create a system restore point. This provides a safety net if something unexpected happens. Ensure you have an administrator account or the credentials to elevate privileges when stopping services. Do not delete folders outside the update cache path unless you are certain of their purpose. Clear cache only while the Update service is stopped to prevent in-use file access issues.
Quick OS-native methods you can use
Windows 11 provides both GUI and command-line options to reset update components. The GUI path (Settings) is user-friendly for basic users, while PowerShell or Command Prompt offers precise control for advanced users. In many cases, using the built-in tools to stop the update service, delete the cache, and restart services is more reliable than looking for individual files. This section outlines both approaches so you can pick the method that fits your comfort level and system setup.
Manual file deletion explained
If you prefer a hands-on approach, you can manually delete the cache by removing the files under C:\Windows\SoftwareDistribution and the Catroot2 folder. Deleting these folders forces Windows Update to re-download all necessary components. Do this only after stopping the Windows Update service and ensuring no update processes are running. After deletion, you’ll restart services and re-check for updates.
Using command-line steps for precision
Power users can execute a sequence of commands to safely reset Windows Update components. The typical flow is to stop services, rename or delete the SoftwareDistribution and Catroot2 folders, then start services again and check for updates. This method minimizes manual file handling and reduces the risk of deleting the wrong data. Always run commands with administrator privileges to ensure system-level changes are applied.
What to do after clearing the cache and how to verify
Once the cache is cleared and updates have been re-initiated, monitor Windows Update for successful downloads and installations. Check the update history to confirm that the latest patches were installed. If updates still fail, review error codes, run the Windows Update Troubleshooter, and consider additional steps like resetting the Windows Update components fully or contacting support if the issue persists.
Maintenance tips to reduce future cache issues
Regular maintenance can prevent cache-related problems. Keep your disk space healthy, run regular disk cleanup, and install updates promptly to minimize fragmentation and corruption risks. Periodically performing a cache refresh after major updates or system changes can help ensure smoother updates in the future. Avoid interrupting updates and perform maintenance tasks when the system is idle.
How to avoid common pitfalls
- Do not delete system folders outside SoftwareDistribution and Catroot2 unless you know their purpose.
- Always stop the Windows Update service before deleting cache files.
- After clearing the cache, reboot if you encounter unexpected behavior or if services fail to restart.
Tools & Materials
- Administrative access to Windows 11 (admin account or UAC elevation)(You may need to run with administrator privileges to stop services and delete system files.)
- Access to Services app or an elevated shell(Use services.msc or built-in command-line utilities.)
- Command Prompt or PowerShell (admin rights)(Needed to run net stop wuauserv, renaming, and deletion commands.)
- File Explorer access to C:\Windows\SoftwareDistribution\Download and Catroot2(Target folders that hold update payloads and certificates.)
- Backup point or system restore (optional but recommended)(Provides a safety net in case of unexpected issues.)
- Disk space check (optional)(Ensure there is enough free space for re-downloading updates.)
Steps
Estimated time: 15-25 minutes
- 1
Open an elevated PowerShell or Command Prompt
Launch PowerShell or Command Prompt as Administrator to gain the necessary privileges for stopping services and editing system folders. This prevents access errors during the cleanup.
Tip: Tip: Right-click the Start button and select Windows Terminal (Admin) for a combined, elevated interface. - 2
Stop Windows Update services
Stop the update service and dependent services to avoid file locks while clearing the cache. Use net stop wuauserv and, if needed, net stop bits, cryptsvc, and msiserver.
Tip: Pro tip: Run all related stop commands, then check that services show a status of 'Stopped' before proceeding. - 3
Delete or rename cache folders
Navigate to C:\Windows\SoftwareDistribution and C:\Windows\System32\Catroot2, then delete or rename these folders. Renaming can be safer if you want an easy rollback.
Tip: Warning: Be sure the services are stopped; deleting while active can fail or corrupt data. - 4
Restart Windows Update services
Start the services again (e.g., net start wuauserv). This initializes a fresh update cache and allows Windows Update to re-download necessary files.
Tip: Pro tip: Open the Settings app and check for updates after the services start to verify progress. - 5
Check for updates and monitor progress
Go to Settings > Update & Security > Windows Update and select Check for updates. Observe the download and installation progress for any new errors.
Tip: Pro tip: If you see error codes, note them for troubleshooting or support reference. - 6
Reboot and verify stability
Restart your PC to ensure changes take effect and to refresh the update state. After reboot, verify that the latest updates are installed and the system is stable.
Tip: Pro tip: Review the update history to confirm which patches were installed successfully.
Frequently Asked Questions
What is the Windows Update cache and why is it stored?
The Windows Update cache holds downloaded update files before installation. If the cache becomes corrupted or stale, updates may fail or stall. Clearing it prompts Windows Update to re-download fresh payloads, often resolving errors.
The Windows Update cache is a storage area for update files. Clearing it forces Windows Update to re-download fresh files, which can fix stalled or failed updates.
Is it safe to delete update cache files?
Yes, it’s safe when you stop the update services first. Deleting the cache only removes downloaded files, not your personal data or installed programs. Windows will re-download needed files during the next update.
Yes, as long as you stop the update services first—the files are temporary and only used for updates.
Do I need to clear the cache every time updates fail?
Not every time. Use it as a first troubleshooting step for stalled or failing updates. If issues persist, explore additional steps like the Windows Update troubleshooter or a component reset.
It's a good first step, but if problems persist you may need more troubleshooting.
What should I do if updates still fail after clearing cache?
Note the error codes shown in Windows Update. Use the built-in troubleshooter, check your network settings, and consider a full reset of Windows Update components if needed.
If failures continue after clearing the cache, note the error codes and try the Windows Update troubleshooter or a deeper reset.
Will clearing the update cache speed up future updates?
Clearing the cache can prevent corruption that slows updates, but overall update speed also depends on network conditions and server availability. It’s a targeted fix for cache-related bottlenecks.
It can help resolve cache-related slowdowns, but actual speed also depends on your network and Microsoft servers.
Watch Video
What to Remember
- Stop the update service before deleting cache files
- Deleting the cache forces Windows Update to fetch fresh data
- Restart services and verify updates after cleanup
- Create a restore point before making changes
- Use the command-line approach for precision when needed